ADVERTISEMENT
Ensure that the popcorn ceiling is examined by a laboratory that is authorized by the Environmental Protection Agency (EPA) before beginning the process. In the event that your premises were built before to the year 1982, there is a possibility that the ceiling texturing may contain asbestos. In the event that asbestos is found, it is preferable to use a certified specialist who is experienced in the management of hazardous chemicals. In the event that the texture does not include asbestos, you are free to continue with the removal on your own. In spite of this, it is imperative that you remember to switch off the power in the room before beginning the process, since it involves water.
Second Step: Safeguard and Prepare the Space
Take into consideration that removing a popcorn ceiling is a dirty process. In spite of this, adequate planning may considerably cut down on the amount of cleaning required after a job. To begin, remove all of the furniture from the room. Next, cover the floor of the room as well as the lowest area of the walls (about 16 inches high) with heavy-duty plastic sheeting and secure it using masking tape.
The higher walls should also be protected, so don’t forget about it. Use extra tape to fasten the tape that you have placed around the room’s perimeter, which should be slightly below the ceiling. In order to make the procedure go more smoothly, it is possible that you may need to remove any ceiling fittings, such as fans, molding, or hanging lights.
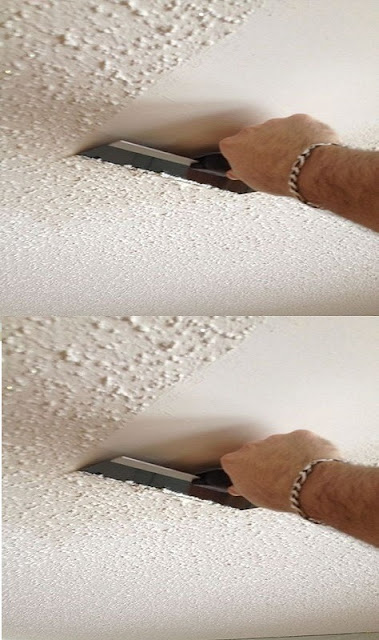
Repeat Step 3: Spray, Wait, and Scrape
The ceiling should be broken down into manageable parts that are four feet square. First, using a garden sprayer, completely saturate the first part, and then allow it to soak for around ten to fifteen minutes. Put on your protective gear, which includes a dust mask and glasses, and then climb up a ladder to get to the area that has been moistened. It is recommended to begin scraping off the popcorn texture while holding the putty knife at a thirty-degree angle to the ceiling. Continue to proceed through the process of spraying, waiting, and scraping, moving from one region to the next until you have completely coated the whole room.
Step Four: Prime, Paint, and Complete the Project
You should continue until you have scraped off the popcorn texture that is present over the whole ceiling, so exposing the drywall surface that is behind it. Following the completion of the task, you could wish to prime and paint the ceiling in order to give it a new appearance. This should be a piece of cake for you to do given that you have previously protected the space with plastic sheeting. Keep in mind that you should not remove the sheeting until the final topcoat has completely dried entirely. Also, make sure that any fixtures that you removed are replaced, and turn the power back on in the room.
Taking a step back, you can now appreciate the change! When the popcorn ceiling is removed, the space will immediately have a more contemporary and brighter atmosphere. Have fun at your new location!
ADVERTISEMENT
