ADVERTISEMENT
Introduction:
Orchids are some of the most exquisite and diverse plants in the gardening world, but their reputation for being difficult to care for often intimidates beginners. One of the best ways to expand your orchid collection without purchasing new plants is by propagating them from leaves. While many gardeners are familiar with propagating orchids from seeds or stem cuttings, using leaves for propagation offers an innovative and rewarding approach. This method is particularly ideal for certain types of orchids, such as the Phalaenopsis, which can easily be propagated through leaf cuttings. This guide will walk you through the steps to successfully propagate orchids from leaves, offering you a simple yet effective way to grow your collection and enjoy the beauty of these stunning plants.
Ingredients:
Healthy Orchid Plant (preferably Phalaenopsis)
Sharp, sterile pruning scissors or knife
Small pot with drainage holes
Orchid growing medium (such as sphagnum moss, orchid bark, or perlite)
Rooting hormone (optional)
Plastic bag or humidity dome
Watering can with distilled water
A bright, indirect light source
Instructions:
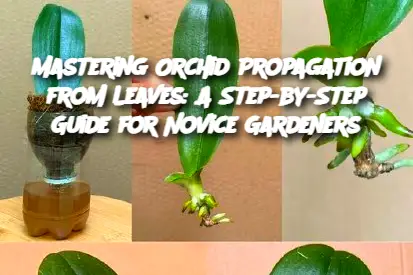
Choose a Healthy Leaf: Select a mature, healthy leaf from your orchid plant. Ensure that the leaf is free from blemishes, diseases, or damage. It should be green and firm, not yellowed or wilted.
Prepare Your Tools: Sterilize your pruning scissors or knife with rubbing alcohol to avoid transmitting any infections or diseases. Cleanliness is key to successful propagation.
Cut the Leaf: Carefully cut the leaf from the plant, making sure to slice as close to the stem as possible. The cutting should be about 4-6 inches long.
Prepare the Cutting: If you wish, you can dip the cut edge of the leaf into rooting hormone to help stimulate root development, though this is optional.
Plant the Cutting: Fill a small pot with orchid-growing medium (such as sphagnum moss, orchid bark, or a mix of both). Place the leaf cutting into the medium, ensuring the cut end is gently buried in the soil. You can bury it about 1-2 inches deep.
Create Humidity: Cover the pot with a plastic bag or a humidity dome to keep the environment humid. Orchids thrive in a high-humidity environment, which is essential for root formation.
Place in Bright, Indirect Light: Set the pot in a location with bright, indirect light. Avoid direct sunlight, as it can scorch the cutting. Maintain a temperature of around 70°F (21°C) to encourage growth.
Water Regularly: Keep the orchid medium moist, but not soaked. Mist the cutting lightly with distilled water to maintain humidity. Check the moisture level often to avoid the medium drying out.
Wait for Roots to Develop: It may take several weeks to a few months for roots to develop, depending on the environment and care. Be patient, and do not disturb the cutting during this time.
Transplant Once Rooted: Once you see roots forming (typically 4-6 weeks), you can transplant the cutting into a new pot with fresh orchid medium. Continue providing it with the appropriate care until it establishes itself as a mature plant.
Serving and Storage Tips:
Optimal Growing Conditions: Orchids propagate best in environments with 50-80% humidity, so consider using a humidity tray or a small humidifier if you’re propagating in a dry room.
Regular Monitoring: Check for new growth every few weeks, and ensure the cutting isn’t rotting by keeping an eye out for mold or rot. If this occurs, remove the affected cutting immediately.
Light Care: Once the orchid starts growing roots, begin gradually increasing its exposure to light. Ensure it gets a balance of light to avoid stunting or harming the plant.
Variations:
ADVERTISEMENT
